The Intelligent Code Remediation (ICR) solution installation consists of server-Side and Client-Side Installation.
Prerequisites
Before starting the installation process, make sure that you have the following privileges:
Access to the relevant SAP Development
- User with Display, create and execute ABAP programs permissions. The user name must not be 'SAPUSER' or 'SAP' or start with 'SAP' prefix.
- Panaya username and password
- .NET Framework, version 4.6.2 and above
- At least 100MB available in the Windows temp files directory
- SAP GUI for Windows: release 7.20, patch level 7, and later releases (including 7.30)
Supported operating systems: Windows 2000, Windows XP, Windows Vista, Windows 7, Windows 10
Supported browsers: Click here for supported browsers information
Important!
- Keep the original system for 3rd party packages
- Panaya uses standard SAP Workbench Change Requests (CRs). For accurate results, verify that the CR includes all the required information to be considered valid transport (e.g., routing information).
- You cannot submit an automatic fix for objects with Syntax errors. Your sync request will be declined to protect the existing code.
- For every Object, a target system must be allocated. Panaya requires this information to determine where to submit the CR.
- To submit Intelligent Code Remediation (ICR) fixes to your SAP development or sandbox system, all custom objects Original System should point to the system where the fixes are submitted.
Click here to learn how to change the original system for objects
Server Side Installation
Step 1 - Download the Source Code
The Intelligent Code Remediation fixes should be synced with your Development environment.
To download the Panaya Intelligent Code Remediation Synchronizer -
- Click on the Settings button

- Verify that the relevant System is selected in the drop-down list

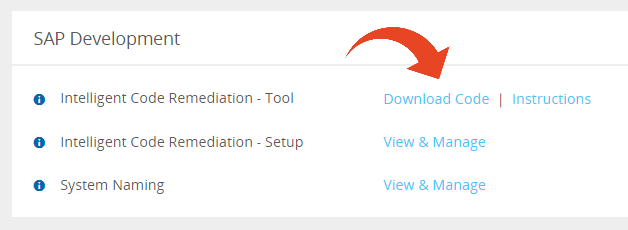
- In SAP Development > Intelligent Code Remediation - Tool, select Download Code

Step 2 - Create an Executable Program & Transaction
- Open the downloaded TXT file and copy the entire source code displayed
- Use the copied source code to create a new executable program in SAP
- Name the program ZPANAYA_ACC_SYNC
- Create a transaction for the program named ZPANAYA_ACC_SYNC.
The transaction type should be Program and selection screen (report transaction) - Set permission to use the transaction ZPANAYA_ACC_SYNC for all users who are to sync Intelligent Code Remediation fixes
For further instructions on how to create an executable program & transaction in SAP, click here
Panaya RDx synchronizer requires that a transaction with the exact hardcoded name ZPANAYA_ACC_SYNC be present in the system.
Be sure to create such a transaction and keep the name unchanged.
How to Uninstall?
To remove the Intelligent Code Remediation Synchronizer, delete the ABAP program ZPANAYA_ACC_SYNC.
Step 3 - Set Server Parameters
- Enable GUI Scripting
The Intelligent Code Remediation synchronizer requires SAP GUI scripting to be enabled.
Please set the system profile parameters as shown below -
- sapgui/user_scripting = TRUE
- sapgui/user_scripting_disable_recording = FALSE
- sapgui/user_scripting_set_readonly = FALSE
More detailed information can be found here -
How to set server parameters to enable GUI scripting?
Step 4 - Enable Authorizations for Users
Each user running the Panaya Synchronizer must have a set of authorizations within the SAP system as listed below:
- Object S_TCODE
a. Value ZPANAYA_ACC_SYNC - Object S_GUI (Authorization for GUI activities)
a. ACTVT (Activity) – 61 (Export)
Note - This authorization is required only in versions 4.7 and higher
Step 5 – Create a Transport
- Create a Workbench transport request for each target system where changes are required. All transports should be created before the sync run begins.
- In the created transport, create tasks for each user who will submit changes. The user name must not be 'SAPUSER' or 'SAP' or start with 'SAP' prefix.
- The transport(s) must have this exact description -
“PANAYA Automatic Code Corrections”
If you only plan to apply changes to a single target system, one transport request is sufficient.
Client-Side Installation
Step 1 - Enable GUI Scripting & Deny Pop-Up Notifications
Panaya sync requires SAP GUI scripting to be enabled and disable SAP pop-up notifications for accelerated testing.
The process described here must be repeated for every client machine using the Synchronizer.
Step 2 - Set SAP Network Settings to High-Speed Connection
To assure completeness and accuracy of data recorded, please make sure the Network Settings is set to High-Speed Connection for every client machine using the Synchronizer.
Follow the instructions described here.
Step 3 - Install .NET Framework
.NET Framework version 4.6.2 or above must be present on each user's local machine running the Intelligent Code Remediation Synchronizer.
We recommend using .NET Framework version 4.0. Most computers already have .NET Framework, so usually, no installation is needed.
If you experience issues while installing the Synchronizer, please install the .NET Framework from Microsoft .NET Framework 4.0.
Step 4 - Security Settings Configuration
Please ensure that proxy settings are not preventing the Synchronizer from working correctly.
If you have an anti-virus, VPN, Remote Machine, or Virtual Machine, you might need to add Panaya to the safe domains list. Sites on this list do not require a proxy or any other security permission.
Please add *.Panaya.com to your white-list or your exceptions lists (e.g., proxy, anti-virus, etc.)
Alternatively, add the following URLs to your white-list:
my.panaya.com or emea.panaya.com
cdn.panaya.com
sso-us.panaya.com or sso-emea.panaya.com
Step 5 - Browser Configuration
- The Local Installation Mode is required to use Google Chrome with Panaya's Intelligent Code Remediation synchronizer
- Add Panaya (*.panaya.com) to your trusted sites per the exact steps in this article
- If you are using Microsoft Edge, no additional browser configuration is required