When importing Tests and Quick Tests from another project, you can import using an Excel spreadsheet.
The Excel file option allows you to leverage existing test assets and include -
Copied Test activities from previous projects
Duplicated test activities with business process variants
Specific updates for selected fields
The target path (Cycle or Folder) in the project structure
To import Tests from another project using an Excel spreadsheet -
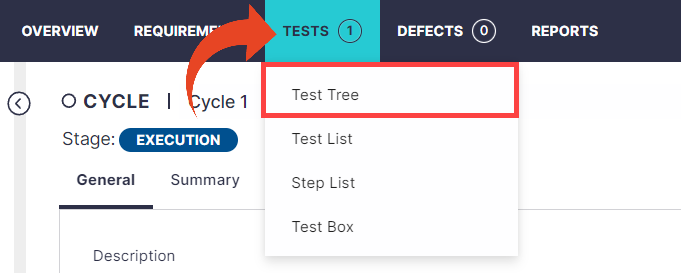
From within a Project - hover over the Tests tab and select the Test Tree.
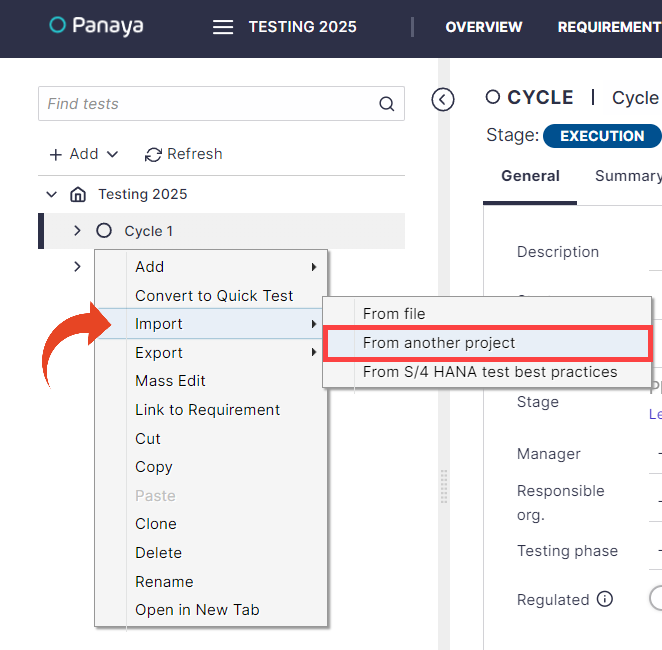
Right-click on any node in the Tree. Select Import and then Import from Another Project.
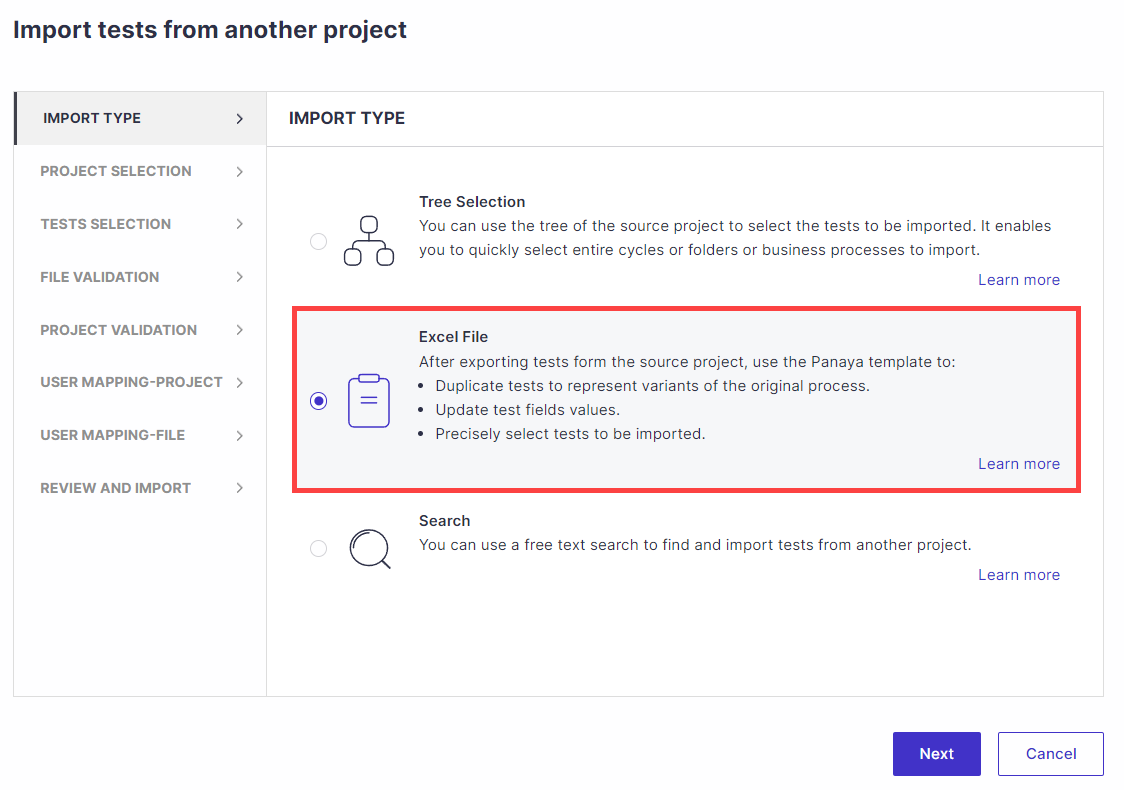
Select Excel File and click Next.
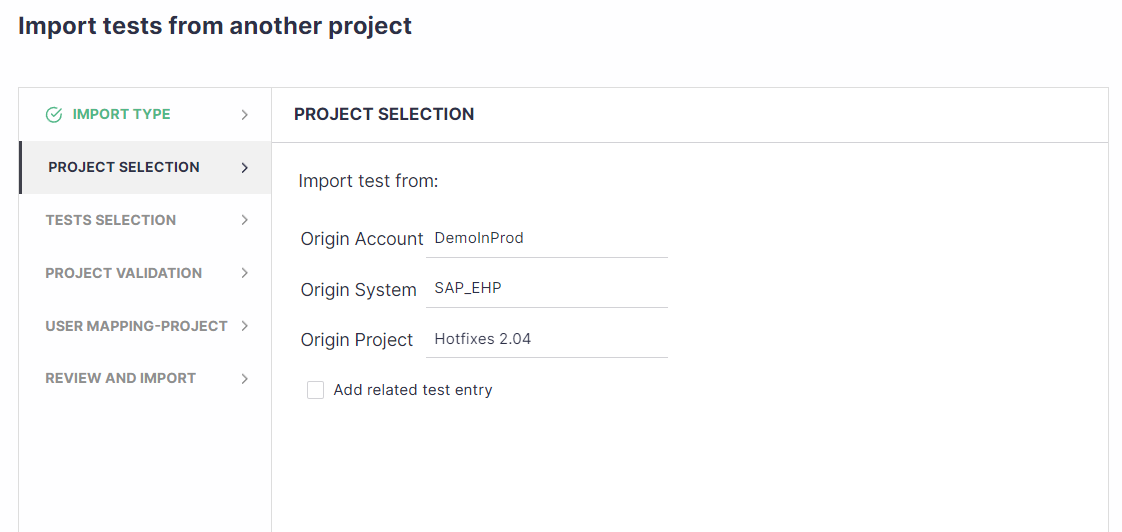
Select the source Account (if applicable), System, and Project to import from.
Check the “Add related test entry” option to create a link between the original and imported tests automatically.
This bi-directional connection makes tracking the origin of tests and their destination counterparts across projects easier.
When you’re done, you can click Next.
Click on Download Panaya template.

Before you continue
You will need to access the source project and take note of the Test or Quick Test ID numbers, path location (Cycle, Folder, etc.), and Test Names to be imported. We recommend using the Test Steps Export option to retrieve this information easily.
Fill in the import details in the template as follows -
Test Name (mandatory)
Test ID (mandatory) - Use this field to specify the ID number of the Tests or Quick Tests you wish to import. ID numbers should be identical to the IDs in the source project from where you want to import the activities.
Path (mandatory) - Use this field to specify where you wish the imported activities to appear in the target project's Test Tree.
If you wish for them to appear under a new Cycle named "UAT 1" within a Folder named "P2P", use the following syntax:
UAT 1 > P2P
IT Owner and BP Owner - Use these fields to define the IT or Business Process owner. In the User Mapping phase of the wizard, you will be able to map these users to actual target project users (see instructions below).
All Other Fields
If you specify any other values for other fields in the Excel template, Panaya will overwrite the details in the original test of the source project. The newly created (copied) activities will include the provided values.
When you fill in all the details in the template, save it locally and click Next in the Wizard.
To clear values from fields -
Fill in *blank* for any field, and Panaya will clear the values for this field in the target project.
Tests Selection
Use the Project drop-down list to specify the source project from where you wish the newly created activities to be imported.
Then click on Choose File to browse and locate the saved template file. Click Next.
Tests - Validation
Panaya will display a validation report highlighting any warnings or errors.
For example, in the screenshot below, you can see that Panaya did not locate test IDs 1000, 1001, 1002, and 1016 in the source project. You can go back and make changes to your Excel file or skip the import of these specific activity IDs.User Mapping - Project (Step Assignment)
In the case of importing activities that were initially assigned to users that do not appear in the target project, you should be able to select between 3 options -
Add user to the project - Add the users to the target project during the test import.
Select a User from the List - Assign activity to an existing project user
Leave blank - The activity will remain unassignedUser Mapping - File
If you populated the IT Owner or BP Owner fields, follow the instructions for User Mapping using the template file below.
Otherwise, the Wizard will skip this phase.Panaya will display a summary of the import details. Click Submit to import.
User Mapping - File
Panaya allows you to connect the IT Owner and Business Owner users to the actual project users within the target Panaya project.
You can skip User Mapping by selecting Auto Mapping. In this case, users will be mapped based on previous mapping (if available).
You need to be granted the Create and Edit Permission if you wish to map users while importing Test activities

In the User Mapping page, select to download the user mapping file and save it locally.
Open the file and select the correct email address for existing users
For new users, type in the active email address, first and last name.
Go back to the Import Tests Wizard, and click Choose File to select the Panaya User Mapping XLS file.
Process with the wizard until you submit your Import request.