This information is relevant for standalone Patches or Upgrade projects. If you are using Release Dynamix, follow these instructions instead
Panaya’s solution requires running a Java program on your Oracle Apps Server. This program extracts the vanilla versions of the relevant files in the patch for Panaya to present the impact on your Oracle environment.
Important
You must upload at least one Custom Code extract to Panaya before uploading a patch extract for analysis.
Please also verify the code extraction (ETL) was uploaded in the last three months (90 days) for your system, else the Patch analysis will not succeed.
Before running the Patches Extraction Process, please make sure that you meet the requirements
Extracting The Patches Files
To upload a patch:
- Log in to Panaya
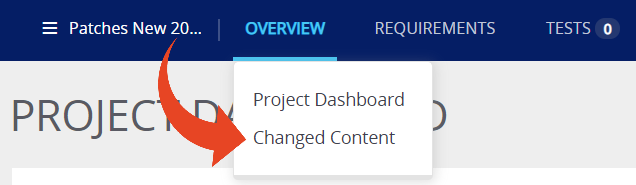
- Use the Menu button
 to select a Patches Project
 - From with the Patches Project, hover over the Overview tab and select Changed Content
- In the Project Setup section, select Upload Content
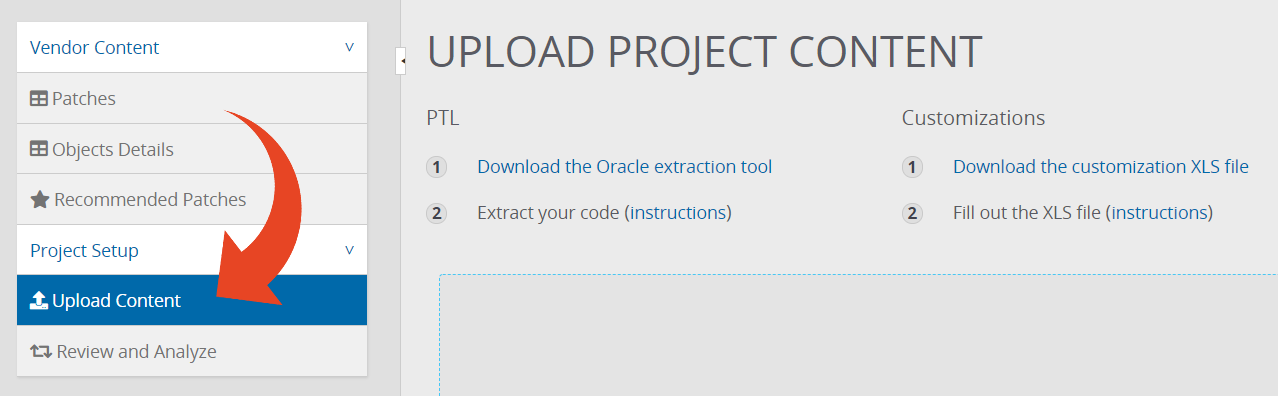
- Click on Download the Oracle extraction tool to download the extraction tool
- It is recommended to download the most updated version from the Panaya Upload Content screen. Do not use older versions.
- Upload the panaya-ptl-extractor.jar file to your Oracle Application Server
- Change your working directory to the location of the panaya-ptl-extractor.jar
- Create a directory that will contain only the ZIP files of the patches that you want to analyze before they have been installed
- Do not unzip or install the files
- Using your Oracle Apps OS user (with access to the Oracle environments), execute one of the following commands:
java -jar panaya-ptl-extractor.jar [-prompt] <Patches directory>
Parameters explanation -
<APPS password> - Mandatory - The password of your APPS schema in the DB
<Patches directory> - Mandatory - The location of the patches you downloaded
[-prompt] - this will open a dialog box for the user to enter the apps password. This will mask the password for cases where other users attempt to sign in to the system and execute the command ps -ef.
<Patches directory> - Mandatory - The location of the patches you downloaded
[-prompt] - this will open a dialog box for the user to enter the apps password. This will mask the password for cases where other users attempt to sign in to the system and execute the command ps -ef.
An output directory will automatically be created for you during the patches extraction process. The directory's name will be output_<date>_<time>.
When running, the screen will look like this:
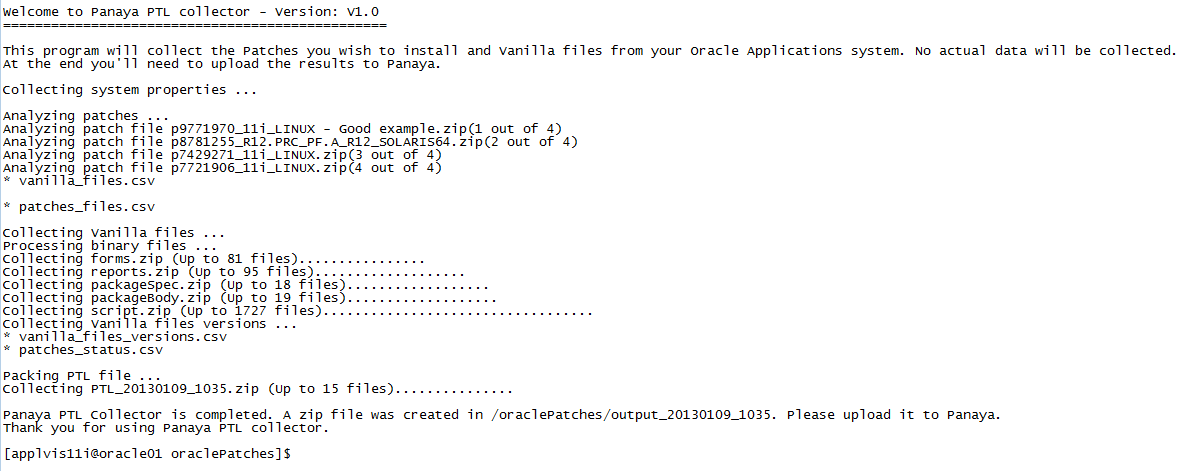
At the end of the process, one ZIP File will be created in your output directory (e.g., PTL_20121015_1259.zip), which you’ll be asked to upload to the Panaya website.
If you don’t have access from your Application server to the Panaya website, please copy the file from there.
At the end of the process, one ZIP File will be created in your output directory (e.g., PTL_20121015_1259.zip), which you’ll be asked to upload to the Panaya website.
If you don’t have access from your Application server to the Panaya website, please copy the file from there.
Note
If you are using a controlled release patch, please click here for additional instructions.
If you are running the Patches extractor on 12c database, follow the instructions described here
If you are using a controlled release patch, please click here for additional instructions.
If you are running the Patches extractor on 12c database, follow the instructions described here
Upload The Patches Extract File
- Select Click to browse and locate the zipped file created by the patches extraction process. You can also drop the ZIP file onto the cloud area.
- It is also possible to drop your customizations XLS file here. For more information, click here.
- Select Start upload.
- The duration of the upload depends upon the size of the file.
- When the upload process is complete, you will be able to view the list of uploaded files below.