These instructions are for an ECC upgrade or for extracting code to support Change Analysis. If you are converting your ECC system to S/4HANA using Panaya S/4Convert, please use these instructions. If you are upgrading your S/4HANA system using Panaya S/4Accelerate, please use these instructions.
Panaya's solution requires an ABAP program installation on your SAP systems. This program performs the following high-level activities:
- Extraction of custom-developed ABAP code.
- Identification and extraction of used transactions - finding out which transactions are used in your production system.
- Extraction of defined systems in Solution Manager.
Prerequisites
Before starting the installation process, make sure you have the following privileges:
- Access to your SAP Development, QA, and Production system
- User with development permissions to:
a. Display, create and execute ABAP programs
b. Running jobssu
We recommend selecting a user with SAP_ALL or a similar strong BASIS user authorizations - A Panaya username and password
- Internet Explorer browser versions 9 and above, Google Chrome 15 and above, or Firefox 16 and above.
- If migrating to HANA, please follow these instructions before you continue with this process
- Depending on the system size and usage, the extraction process may consume more memory than is currently allocated. If possible, use transaction SE38 and
run the rsmemory report to adjust the default 2GB heap setting of the following parameters:
abap/heap area dia and abap/heap area nondia to 8GB
abap/heap area total to 16GB
Execute the following steps to complete the process -
- Step A - Download the ABAP Code
- Step B - Create an Executable Program
- Step C - Define User Authorizations for RFC connections
- Step D - Defining RFC Connections
- Step E - Execute the Extraction Program
- Step F - Upload your Custom Code
Step A - Download the ABAP Code
- Click on the Settings button

- In the Settings panel, select Code Box

- Panaya analysis is based on custom objects extracted from your system. There are differences between objects in the development system and the production system in most cases. Because we are extracting the custom-developed objects only from one instance, please choose the system that best represents your analysis needs.
Should you require assistance defining from which system in your landscape you should extract the custom code, please contact our support team, and they will be happy to answer any questions you may have. - Before you continue, check that the relevant System appears on the top left corner of the screen

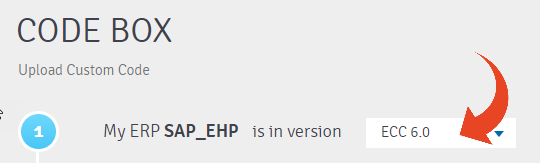
- Select your current ERP version
- Download the ABAP code

If you have trouble downloading the code, use the View option to copy and paste the code to your system.
The extractor code is constantly updated for improvements and according to your system needs, and the project's progress. It also contains dynamically generated data based on the last analysis. To avoid delays and for better results, you are required to download a new version of the extractor code before every new extraction - this should be done after the last analysis has been completed. If you would like to have this done automatically, please see this article.
Step B - Create an Executable Program
This step explains how to install Panaya’s ABAP code extraction program on your SAP system. The ABAP extraction program reads the repository objects locally and extracts customer-developed objects from the system it runs on. The program also uses RFC connections to extract data from the production and other systems.
- Create an executable program named ZPANAYA_EXTRACT_PROG_LIB and import or paste the ABAP code.
- Save the program in a change request, should you need to execute it on other systems like QA or Production.
To learn how to install an ABAP program, click here
Step C - Define User Authorizations for RFC connections
Before you continue to the next step, please identify a user for the RFC.
The RFC users must have the required authorizations as described here.
Step D - Defining RFC Connections
In this step, you will define RFC connections for Production, Solution Manager, BW(Optional)
Step E - Execute the Extraction Program
- Log in to the relevant SAP system
- Start transaction SE38
- Type the program name ZPANAYA_EXTRACT_PROG_LIB and press the execute button (F8)
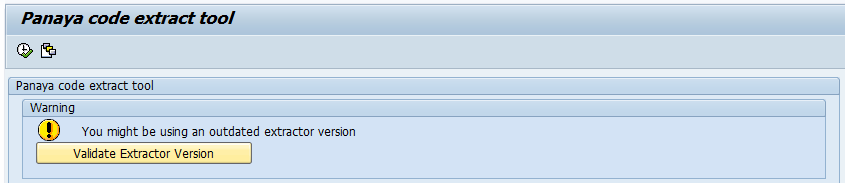
- The system will automatically perform a version validation check. A validate extraction button will appear if the automatic validation cannot be performed. In this case, run the validation to avoid extraction failure.
- Under Execution mode, Full Extraction is selected by default.
Selecting Usage Only will result in extraction with usage information only.
To learn how to extract usage statistics only, click here.
Select Background and enter the Background Directory path (e.g., \tmp) on the SAP application server. Running the extraction in Foreground mode is not recommended and may fail on larger SAP systems. For best performance and reliability, please use the Background mode.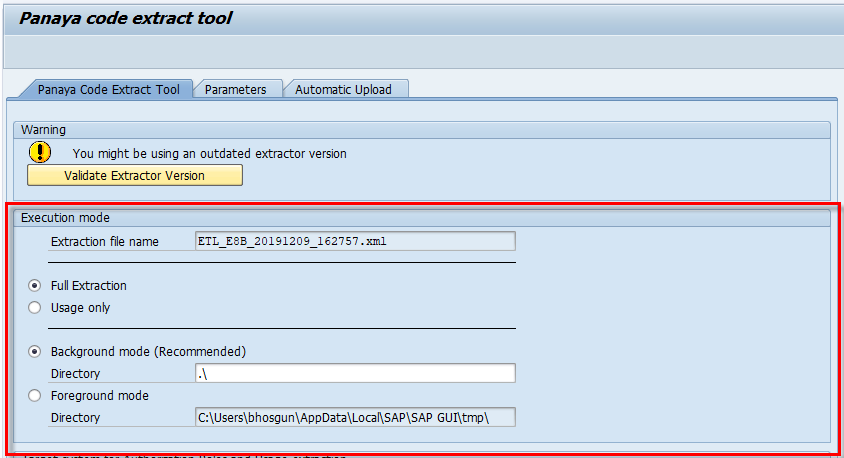
- For Target system for Roles and Usage extraction, under RFC destination, type - PANAYA_PRD
- If Systems' Roles in the Landscape section is available, follow the steps described here.
- For Solution Manager target system for Systems extraction, under RFC destination, type - PANAYA_SM
(not applicable for SCM systems) - For BW target system for BW extraction, under RFC destination, type - PANAYA_BW
- Do not check the Usage Only checkbox. Checking this box will result in extraction with usage information only.
To learn how to extract usage statistics only, click here. - If migrating to HANA 2.0, under HANA SAP Code Inspector execution mode, select options A or B as described in this article.
- For the Fiori Apps, ODATA Services and ODATA Usage, the default is NONE and Panaya_PRD. This means that they will be extracted from the same system where the Panaya code extraction is running, and their usage from the target Production system. For different configuration options, please see this guide.
- From the Program drop-down menu, select Execute in Background
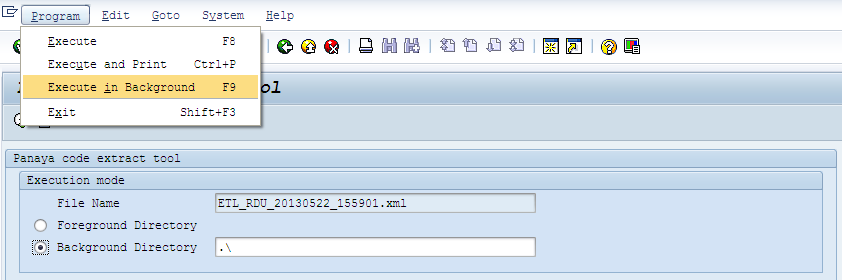 If the Execute in Background option is disabled, please verify that the Background Directory is selected under Execution mode, and the Background Directory path (e.g., \tmp) is the correct path on the SAP application server.
 - Select to create an immediate job (you can review the job processed in SM37)
- Once completed, please check that an XML file was created in the defined path.
If you cannot locate the file, click here for assistance.
Note
The program typically runs between 45 minutes to two hours, depending on the extent of custom objects developed in your system and usage information, although in some cases may take longer.
The program typically runs between 45 minutes to two hours, depending on the extent of custom objects developed in your system and usage information, although in some cases may take longer.
Step F - Upload Your Custom Code
- Locate the extraction file. Click here to learn how.
2. Compress the XML file on the server using Gzip (RAR files are not supported). Alternatively, enable "Compress Results File Run Mode" by manually configuring the parameters.
3. Do not edit or transfer the file using SAP transactions like AL11, CG3Z, or others. The file must stay in UTF-8 encoding format.
4. Use a file-transfer tool like WinSCP to download the file to your local computer.
5. After compression, upload the file to Panaya Code Box.
6. Select the relevant System and ERP version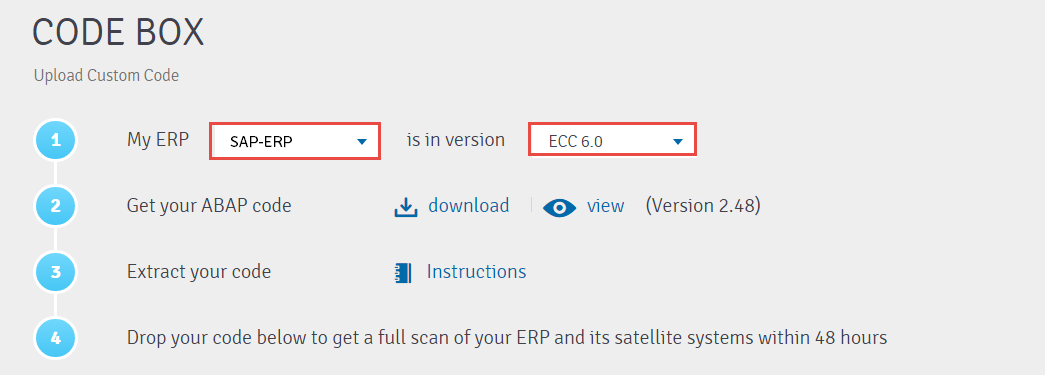 7. Drop the ZIP file back to Panaya Code Box or click to browse and select it.
8. Click on the Upload button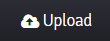
For Release Dynamix - Select whether you wish to update all active projects or only non-upgrade active projects (Release Dynamix projects only)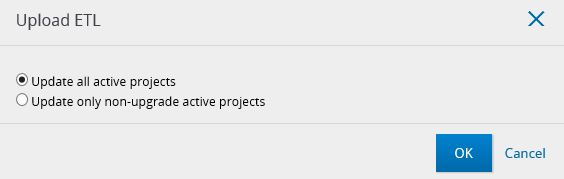 9. Once uploaded, you should receive a confirmation email regarding your custom code upload.
10. Users with the following permissions will be notified by email once the analysis is available (this usually takes 48 hours or less) -
- Code Box - Upload ETL permission
- Users - Create and Edit permission
All information uploaded to Panaya via the website is encrypted using SSL technology. Read more.